Broadcaster
Download v1.2.0
Changelog (RSS, Atom)
MIT Licence
Broadcaster is a pair of programs to automate the transmission of amateur radio news broadcasts.
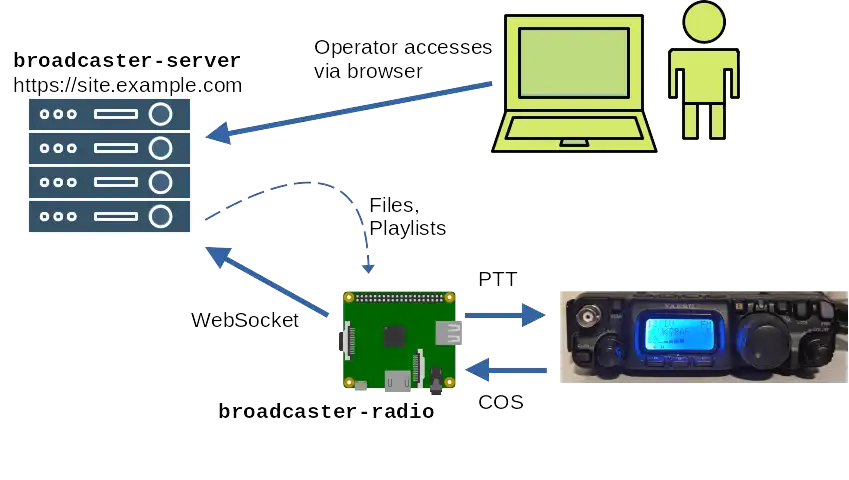
broadcaster-server is an HTTP server with a web interface for uploading audio, registering radios, and scheduling playback.
broadcaster-radio is a CLI application designed to be run as a background service on a Raspberry Pi, which connects to the server to receive instructions and plays audio on an attached radio at the appropriate time. It uses the Raspberry Pi's GPIO for PTT and COS (sensing if the channel is in use).


On this page:
How it works
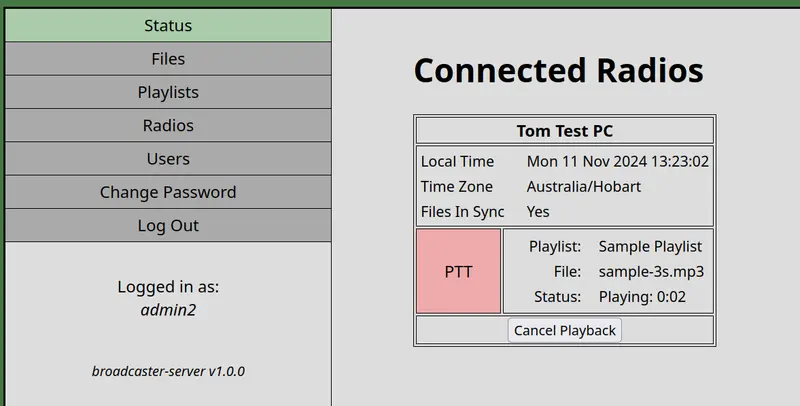
The server is intended to be run as a public-facing website somewhere, for example on a Linux VPS. This is where authorised users can log on to upload and download the audio files, manage playlists and schedules, and create tokens that will permit a radio to log in and sync. There is a live status screen showing which radios are online that allows a user to remotely cancel playback if necessary.
A radio Raspberry Pi is configured with the URL of the server and a unique token that identifies this radio. It connects to the server using a WebSocket and will then proceed to synchronise all files and scheduled playlists. When a playlist's start time is reached, it activates PTT and performs the transmission.

If there is more than one Raspberry Pi connected to the system they will all play the same thing, however they interpret the start time in their locally-configured time zone. If one of them has to wait for the channel to become clear then it may get out of sync with the others. Every radio must have its own unique token.
A useful feature of this arrangement is that the Raspberry Pi does not need to be accessible via the internet, either with or without a VPN. It just needs a regular internet connection with outbound access.
Guide to the web interface
Almost all functions of the web server require you to log in. The one exception is the public access to the audio files, which is located at the path /file-downloads/. All uploaded files are exposed publicly so that the server can be used as a distribution point for others who want to access the audio online. Since the files are intended for amateur radio transmission, it is assumed that there is no reason they need to be kept private.
A user who logs in can control almost everything: view the status of all radios, cancel playback, upload and delete audio files, edit and schedule playlists, and add and remove radio tokens. If a user is an admin then they also have the ability to create and edit other users on the system. The first user you create with the -a flag is an admin.
Supported file types are WAV and MP3. They must have the .wav or .mp3 file extension.
Assign each radio its own unique token and treat them as a secret.
The expected workflow for setting up a transmission is:
- Use the Files section to browse for the audio files on your computer and upload them.
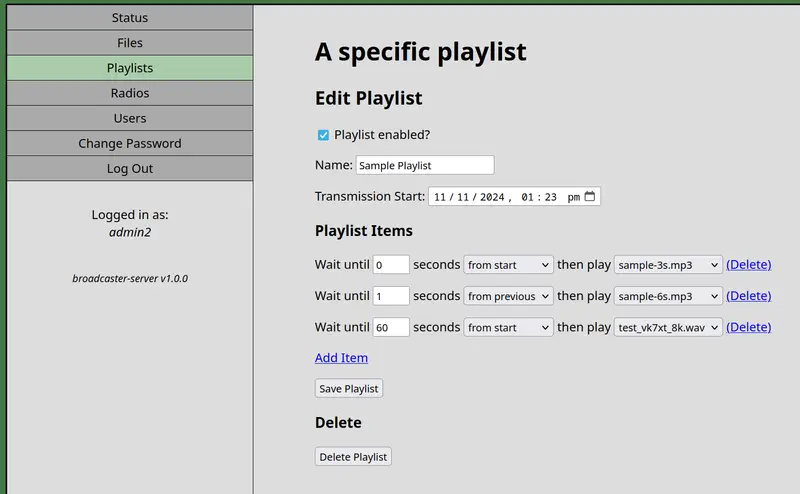
- Use the Playlists section to schedule files to play at a particular time. It could be a single file or a sequence of files. If a playlist consists of more than one audio file then delays can be included between items. The delay is specified in seconds and may be either a delay from when the previous item finished, or relative to the beginning of the entire playlist.
After it has played, the playlist will continue to exist with a scheduled time in the past. To update it, for example with a new recording for the next week:
- Upload the new required file(s).
- Edit the playlist and update the file dropdown(s) to the correct filenames.
- Change the date to the next playback time in the future.
- Remember to click the save button.
Running a server
Download the binary and install it at an appropriate location such as /usr/local/bin/broadcaster-server. The service will need a few things to work.
- A config file, which is passed in with the -c flag.
- A writable directory to store audio files that are uploaded.
- A writable directory where the sqlite database is located. You will need to seed this with an initial username/password (see below).
Server configuration file
Both the server and radio programs require a simple configuration file in TOML format. These are the configuration options available for broadcaster-server:
# Path to Sqlite database file (required)
#
# Either an absolute path, or a relative path from broadcaster-server working directory.
# This file and its containing directory must be writable.
SqliteDB = "test.db"

# Path where uploaded audio files are stored (required)
#
# Either an absolute path, or a relative path from broadcaster-server working directory.
# This directory must be writable.
AudioFilesPath = "audio"

# Interface to bind on (optional - default "0.0.0.0")
# When deploying on the same host as a reverse proxy, switch this to "127.0.0.1".
BindAddress = "0.0.0.0"

# Port to bind on (optional - default 55134)
Port = 55134
Adding the first user
You can add an admin user to the database interactively at the command line by invoking broadcaster-server with the -a flag:
$ broadcaster-server -c server.conf -a
Enter new admin username:
myuser
Enter new admin password (will be printed in the clear):
MyGoodPassword456
Once completed, you should be able to log in through the web interface and create additional users the regular way.
Launching with systemd
It is recommended to configure broadcaster-server to run automatically on boot. On a Linux host with systemd you could use a unit file similar to the following.
[Unit]
Description=Radio Broadcaster Backend

[Service]
ExecStart=/usr/local/bin/broadcaster-server -c /srv/broadcaster/server.conf
User=broadcaster

[Install]
WantedBy=default.target
- Add a user/group for the service to run as:
groupadd broadcaster
useradd -g broadcaster broadcaster - Ensure correct ownership/permissions for both the config file and paths mentioned inside it.
- Place unit file at an appropriate location, e.g., /etc/systemd/system/broadcaster.service
- systemctl enable broadcaster
- systemctl start broadcaster
- Check logs: journalctl --unit broadcaster
Configuring the webserver
Since broadcaster-server handles passwords, any publicly accessible instance should be protected by TLS (HTTPS). broadcaster-server doesn't support configuring TLS directly—the usual approach with this type of software is to place it behind a reverse proxy such as Apache, Caddy or nginx. For popular programs like these, it is easy to automate acquiring TLS certificates from LetsEncrypt. You can use whatever you fancy but take care to ensure that WebSocket connections are also forwarded.
Here is a sample configuration for an Apache VirtualHost.
        ProxyPreserveHost on

        RewriteEngine On
        RewriteCond %{HTTP:Upgrade} =websocket [NC]
        RewriteRule /(.*)           ws://127.0.0.1:8001/$1 [P,L]

        ProxyPass "/" "http://127.0.0.1:8001/"
        ProxyPassReverse "/" "http://127.0.0.1:8001/"
Remember to enable appropriate modules: a2enmod proxy proxy_http proxy_wstunnel rewrite
Running a radio Rasperry Pi
Download the binary and install it at an appropriate location such as /usr/local/bin/broadcaster-radio. The service will need a few things to work.
- A config file, which is passed in with the -c flag.
- A radio attached to the default ALSA audio interface.
- (Optional but recommended) A directory to persist audio files that are downloaded.
- (Optional but recommended) PTT and COS functions connected to GPIO pins.
Radio configuration file
These are the configuration options available for broadcaster-radio:
# Base URL of the broadcaster-server website (required)
ServerURL = "https://my.site.com"

# Secret token identifying this radio (required)
Token = "19f5b7d5a839bd82674b3ce43ab7c3122f3788020e22f988cef1d9e105ad15eb"

# Name of device (under /dev) that represents the GPIO (optional - default "gpiochip0")
# Ensure the user has write permission for this device.
# This is typically done by adding the user to the "gpio" group.
GpioDevice = "gpiochip0"

# GPIO# pin that will be set to 1 while playing audio (optional - default disabled)
PTTPin = 17

# GPIO# pin that will be monitored for channel state (optional - default disabled)
# 1 = carrier detected (channel in use)
# 0 = no carrier (channel is clear, so we are okay to transmit)
# If not provided, radio will transmit blindly when scheduled.
COSPin = 10

# Time zone to interpret start times (optional - default "Local")
# Use one of the "TZ identifiers" listed here:
# https://en.wikipedia.org/wiki/List_of_tz_database_time_zones
TimeZone = "Australia/Hobart"

# Path where downloaded audio files are stored (optional - default tmp directory)
#
# Either an absolute path, or a relative path from broadcaster-radio working directory.
# This directory must be writable.
CachePath = "audio"
Launching with systemd
Like the server component, broadcaster-radio should be configured to start automatically. See the instructions for systemd above. Make sure the chosen user has GPIO permissions as described in the sample configuration file. Ensure your user is a member of the gpio and audio groups to provide access to the soundcard for playback.
Behaviour
broadcaster-radio stores the playlists and schedules in memory, and the audio files on disk. If a CachePath is configured, audio files will be remembered across restarts and will not need to be downloaded again. Files that are deleted on the server will automatically be cleaned up. While the radio has an active connection to the server it will keep all files and playlists in sync in realtime. The file sync status can be observed in the web interface. If no CachePath is configured, a new temporary directory will be created on startup, so all audio files will need to be downloaded after every launch.
If broadcaster-radio loses its connection to the server it will keep trying to reconnect. It will continue to perform any scheduled playback while offline. Any files that were not yet successfully downloaded will be skipped over.
When broadcaster-radio is stopped and restarted (or the device is power cycled) it will forget any playlists and their schedules. It needs to touch base with the server again to confirm what it is supposed to do.