Protect your keys with the Secure Enclave
20 September 2025
This is the transcript and slides from a presentation I gave at /dev/world in Melbourne on September 4, 2025, describing how the Secure Enclave works to protect cryptographic keys in Apple devices, building up to a demo where we perform mutual TLS between two iPhones using the Enclave and the Rust library rustls. If you like to watch things in video format then AUC has the original on their YouTube channel. Source code for the demos in this talk can be found here: https://github.com/thombles/SEDemo.
Hello, hello everybody. My name is Tom and today we are talking about the Secure Enclave. It's a special piece of hardware inside all modern Apple hardware that lets you create and use cryptographic keys which are bound to that physical hardware.
Now I don't want to lose anybody right out of the gate. What do I mean when I say "cryptographic keys" anyway?
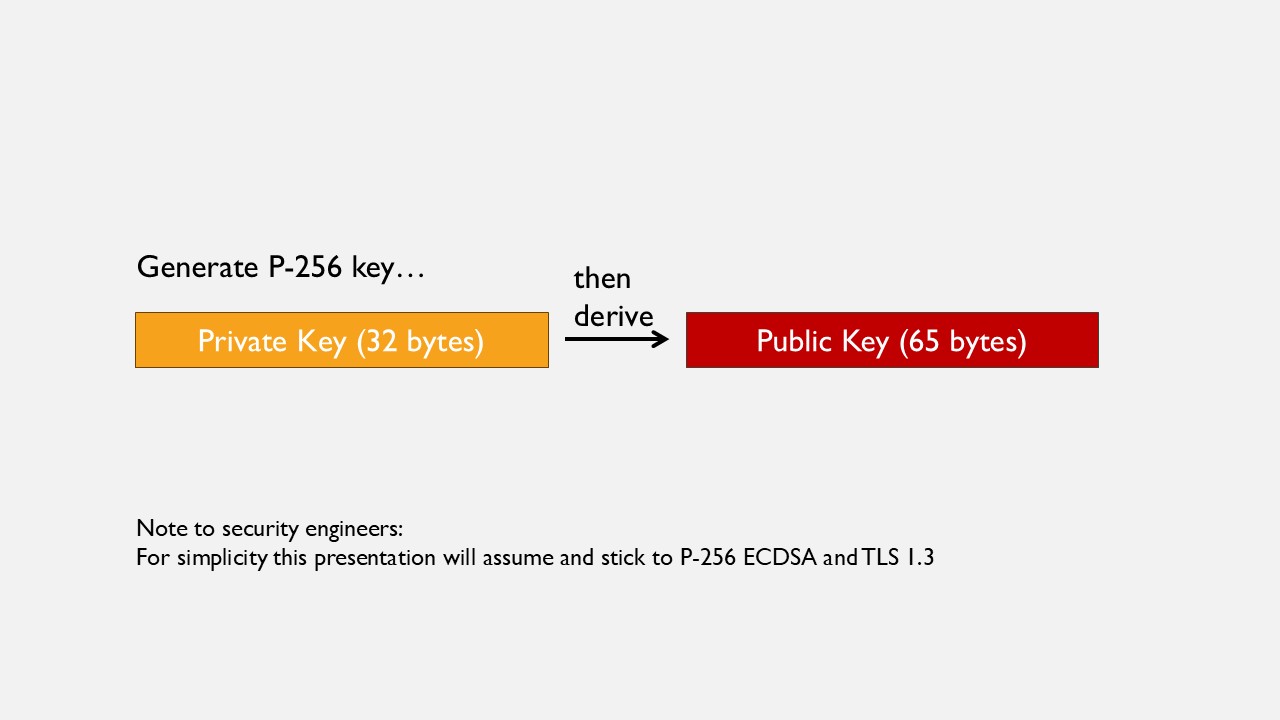
A key, or a private key, is kind of like a long private password. You generate it according to some algorithm on your phone or your computer. Then that key has a corresponding public key and these have a special mathematical relationship with each other. As the name suggests, you have to keep the private key private but the public key you can give to anybody. So why would we even do this?
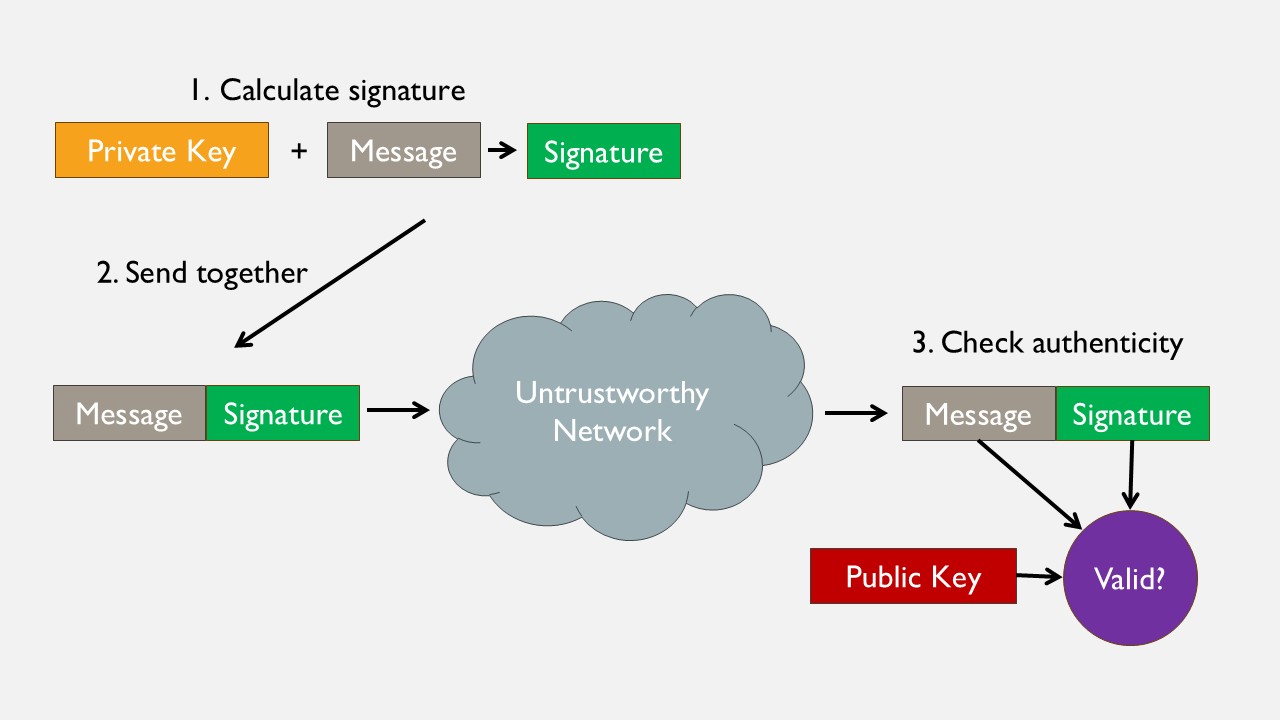
Imagine you want to send a message over a network, and it's an untrusted network. You're worried that somebody could tamper with the message as it flows through. When it gets to the recipient you want to prove two things. You want to prove first of all that it came from you, and not somebody else, and you want to also prove that nobody has messed with it as it went through. You can accomplish this by creating a digital signature. This is an algorithm where you put in your private key and the message you want to sign, and it produces a signature, which is another small binary blob. Then, you send that blob alongside your message when you pass it through the network.
When that arrives at the recipient, and we'll assume for a moment that the recipient already has your public key, they can pass that into a validation algorithm to check the signature. So they put in the public key, the message, and the signature that you sent and they get a sort of true/false result. If it's valid, then the message is authentic and can be trusted. If it's invalid, it means either that the data was modified along the way, or that the message was actually signed by somebody else's key.
In short, the private key creates signatures and the public key checks them. Now what's most interesting about the private key is who controls it. If you create a private key, it can represent you and your messages in the digital world. "This message was signed by Tom's key; therefore this message is the authentic word of Tom!"
Now, this is obviously an extremely useful concept in software but it only holds up so long as Tom doesn't lose his key, or it doesn't get stolen off his computer. So it's therefore very important that we protect these keys and that's how we get back to the Secure Enclave.
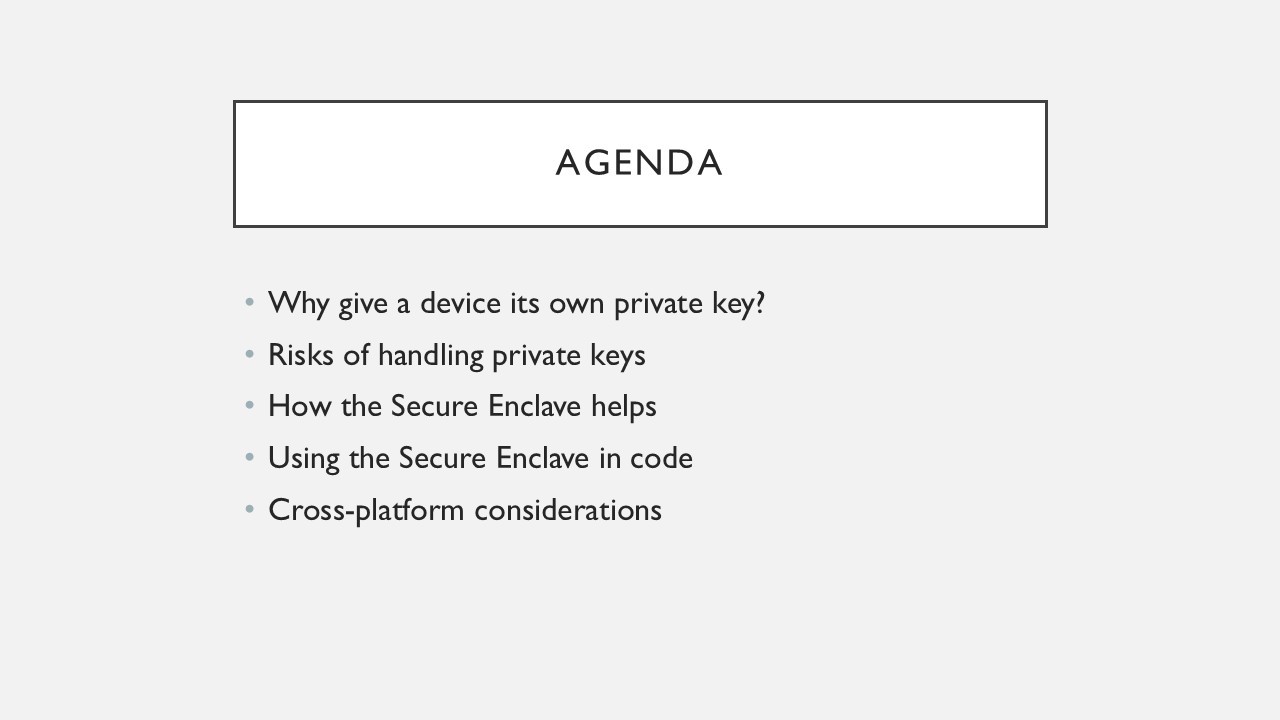
In this talk we're going to cover a few areas: why it's useful for apps, devices, your iPhones—to have private keys on them, especially for local-first and peer-to-peer sorts of apps. We're going to look at some of the security risks associated with handling private keys and see how the Secure Enclave can help us address those risks. We're going to look at some demo apps, some examples of working with the Secure Enclave from code, and see how this compares with other major platforms.
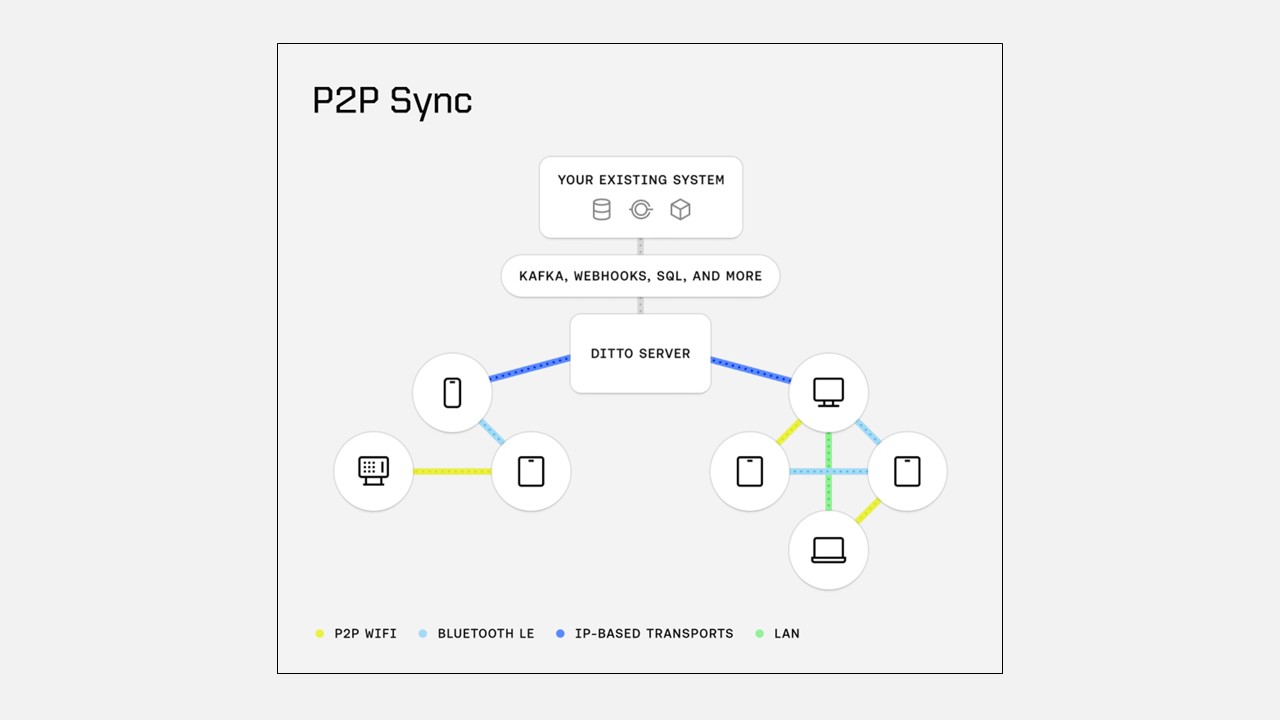
So who am I and why do I care about all this stuff anyway? I come to you from a company called Ditto where these issues are really front and centre. The thing we make is an eventually-consistent distributed database where each of these different devices can be creating and editing data whenever they want and they will connect to their neighbours and synchronise those new bits of data as soon as they have them.
In this architecture, each individual device has to have a lot of autonomy. If it opens a Bluetooth connection to its neighbour it has to be able to prove who it is; that they actually have permission to sync that kind of data. Enforcing these things is made fundamentally possible because these devices have unique private keys. So it's very important to us that we keep those private keys safe.
As part of our ongoing security engineering efforts I recently did some investigation into how Ditto can use hardware security modules—that's the general name for things like the Secure Enclave—to help protect the private keys that we use across all the platforms that we support. So the point of this talk today is to share some of what I learnt during that investigation.
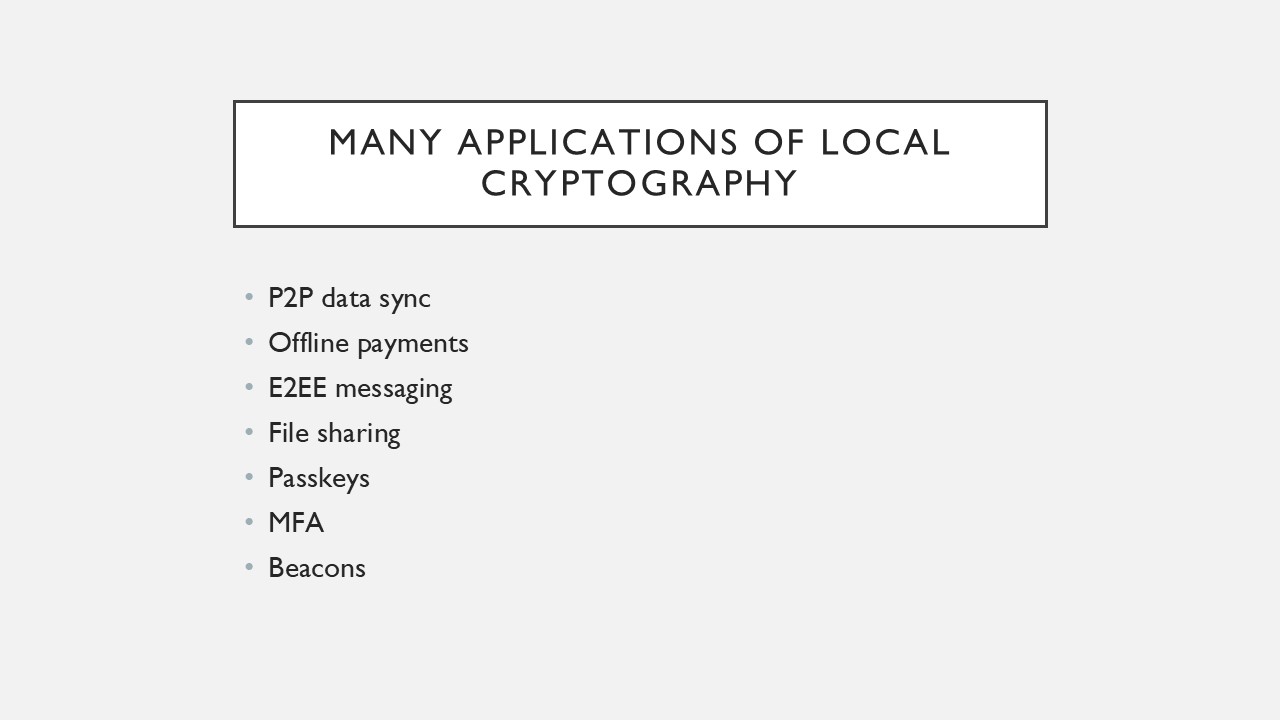
Now as we go through just keep in mind Ditto's not a special case. There are lots of different kinds of applications where you might want to have private keys that you want to protect. We're talking about taking payments offline, end-to-end encrypted messages, file sharing, passkeys, multi-factor authentication, authenticating beacon payloads. So even if the app that you work on is primarily a client/server model, you might still find lots of interesting applications for the kind of cryptography that I'm about to talk about.
To discuss this a bit more, let's imagine a sort of generic situation where our devices need to be able to communicate somewhat directly and I'm going to talk about two different patterns that we might want to use, two forms of communication. It's really going to depend on your app what's most applicable.
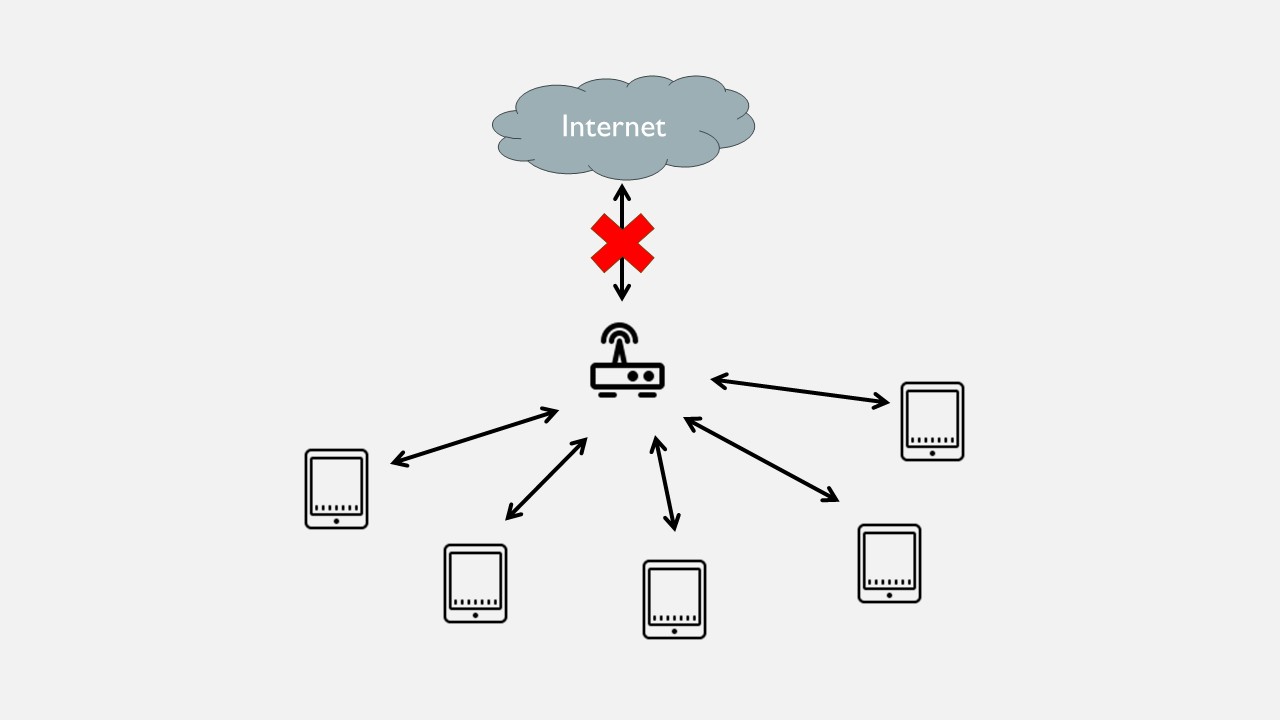
Imagine your software's running on a bunch of iPhones or a bunch of iPads and they can talk to each other over WiFi directly but the internet connection is down so we can't rely on the cloud any more for what we're going to do.
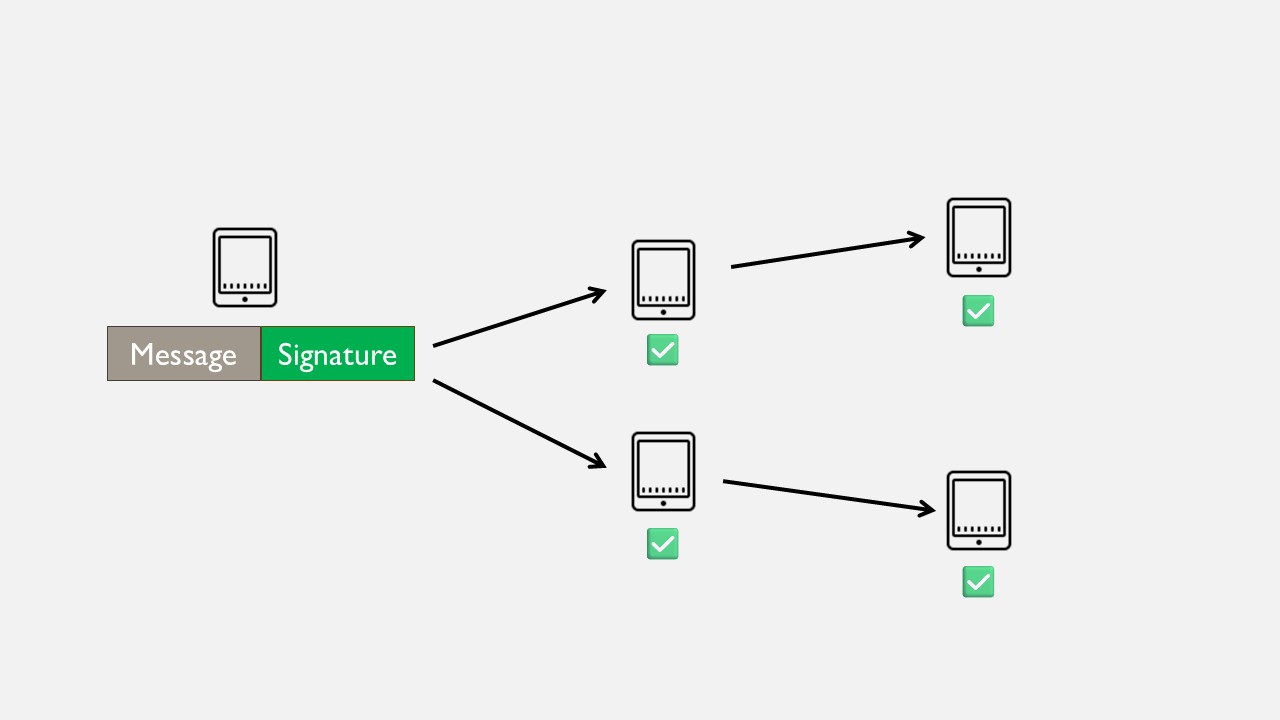
One way we might want to do our work is through broadcast messages. Maybe users are entering data and you want to share that around with everybody else who's in the vicinity. Using signatures, like we were talking about before, we can broadcast that information to everybody. It doesn't matter whether they get it from you directly or whether you give it to a neighbour and that neighbour passes it on to somebody else. So long as they're getting that combination of the message and the signature everybody can use your public key to validate that it came from you and that nobody's messed with it.
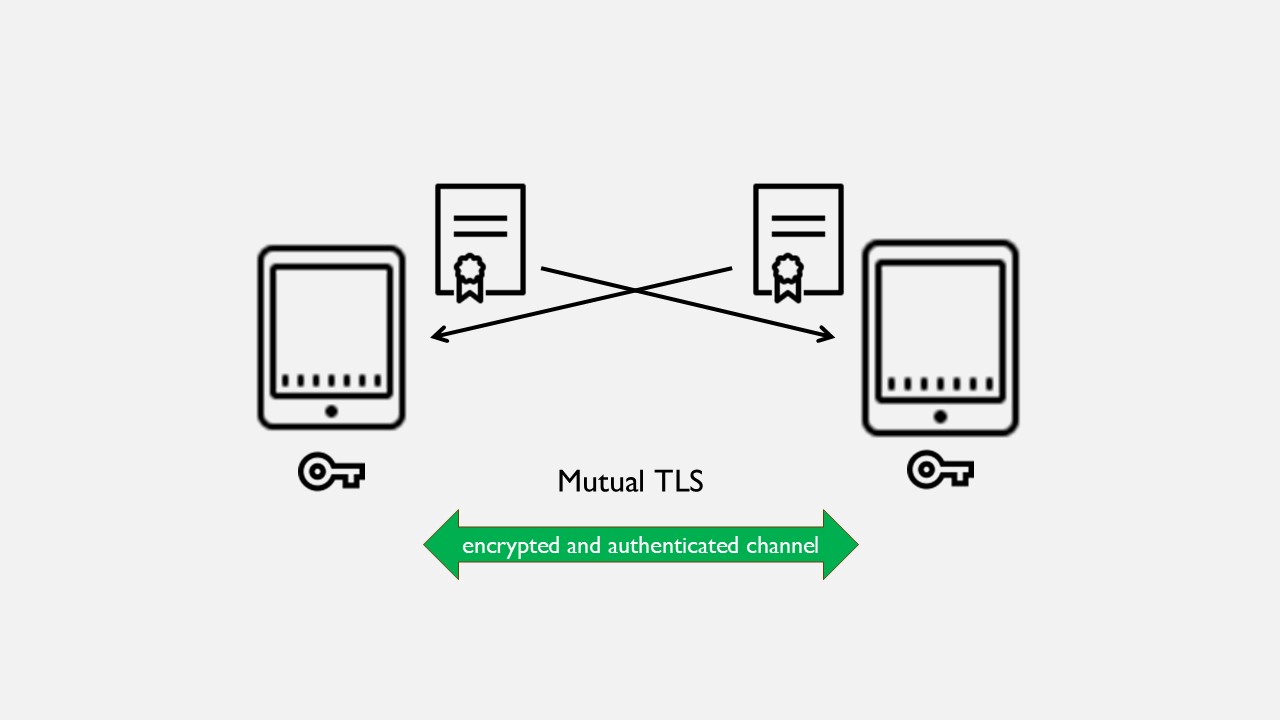
Another pattern that's really useful is creating a secure authenticated and encrypted tunnel between two peers, peer-to-peer. Here I'm going to use the example of TLS. I highly recommend you use a standard protocol for this if you're going down this path. Now TLS, as you may or may not know, is the same protocol that your browser uses when you visit a website using HTTPS. The thing about the browser HTTPS is that that verification is only one-way. It verifies the server to the client, but not the other way around. In peer-to-peer applications like this one we tend to use a variation called mutual TLS and in this situation both sides of the connection have to present a certificate to the other, that both consider satisfactory and trustworthy.
Now as far as private key cryptographic key operations are concerned, these two patterns of communication are actually surprisingly similar. In both cases you have to sign some sort of payload. Now obviously in the broadcast case the payload that you have to sign is just the message that you're sharing around. In the TLS case the payload is actually a piece of ephemeral data, part of the TLS handshake. By signing that ephemeral data you prove to the other device that you control the private key in question.
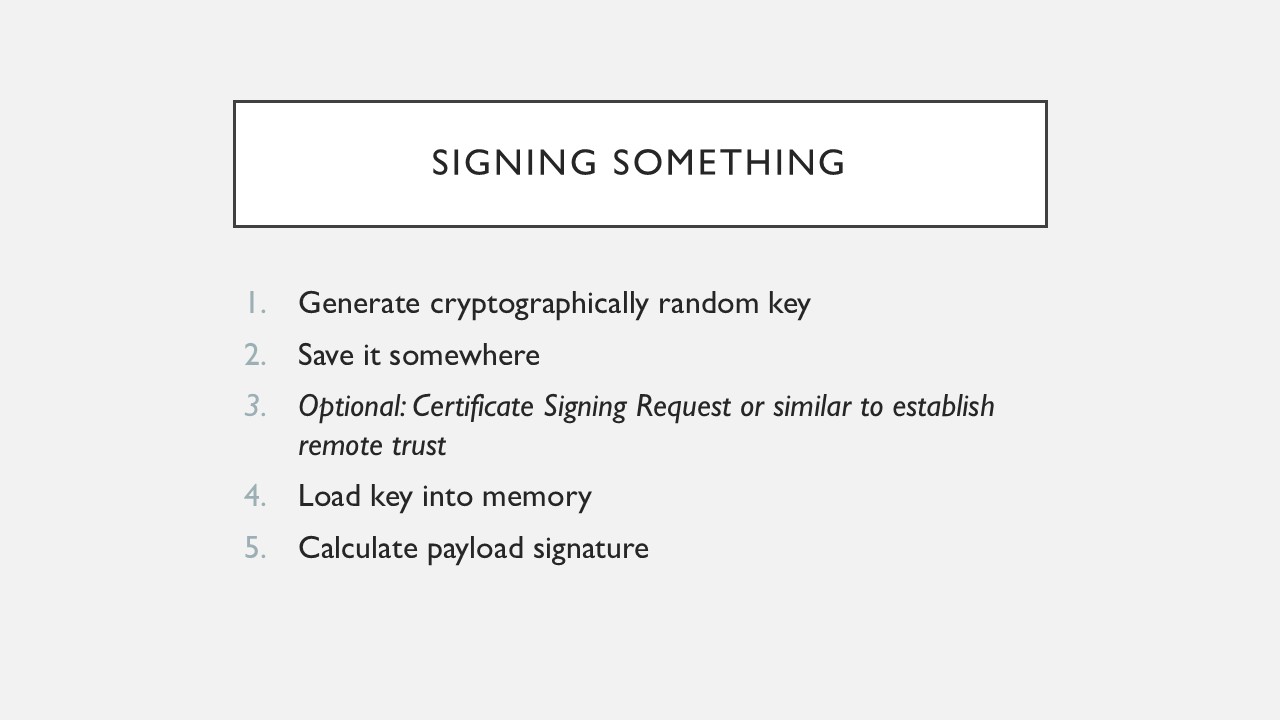
No matter which of these patterns you're actually using, you're always going to follow the same sort of steps when you're signing this stuff in your code, when you're writing this in your app.
First we have to generate a key. It's important that we do that locally on the device because the whole goal here is that no other computers, no other people, ever get to see the key that we're generating. Then we have to save it somewhere because this is going to be a long-term identity.
Later on we're going to need to sign something so we need to load that key into memory somewhere and execute the signing algorithm to create that signature.
I have an optional step 3 there, which you may or may not need depending on how your app works. If you have some sort of central authority who's deciding who's going to be trustworthy and who's not, then you might need that. If you're establishing trust directly through QR codes or something like that then maybe you don't. We'll talk more about that a bit later.
So coming back to the problem of protecting private keys, when you're looking at this kind of flow there's two important questions here. In step 2, where are we going to store it? Is it secret? Is it safe? In step 4, we have to load it into RAM somewhere. Well if it's in RAM that's a risk as well. These parts are both opportunities to expose the key.
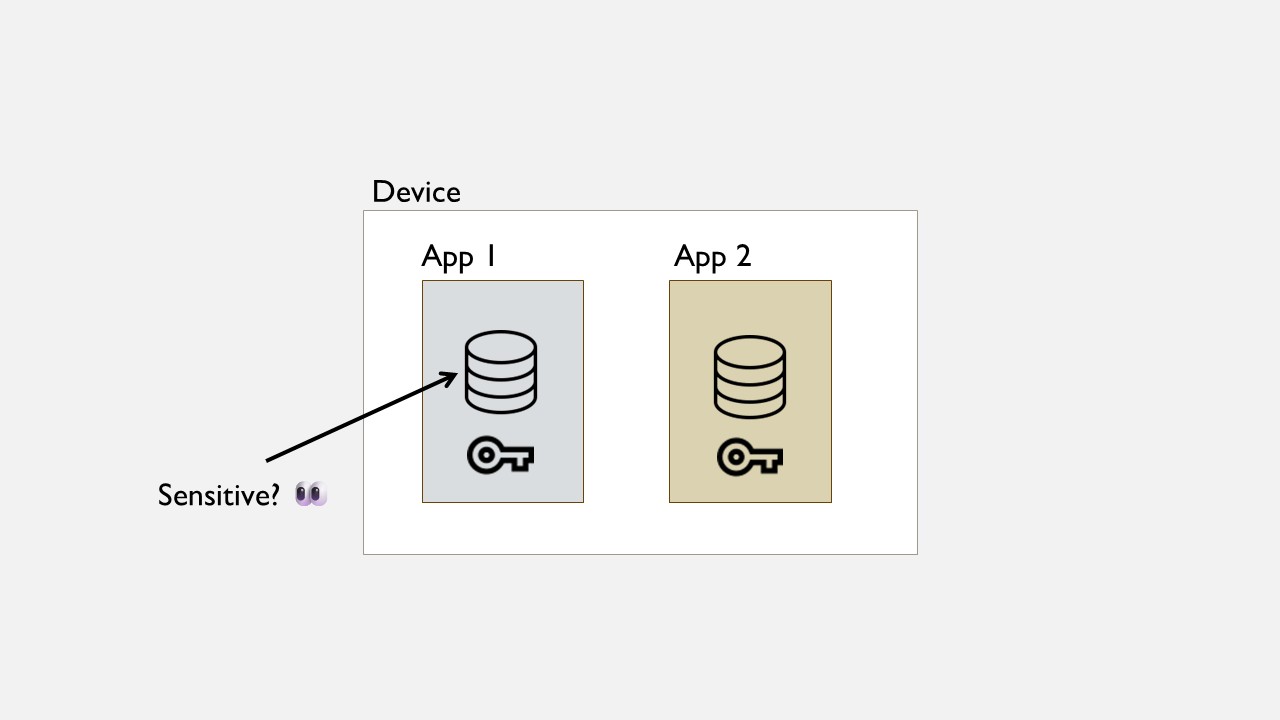
The most basic thing you can do is to store the private key in your app container. You could just write it as a file. And then you open that file into memory and use it to calculate the signature when you need to. That sounds kind of basic but it's actually not terrible on modern hardware because modern iPhones and Androids all have full disk encryption that's protected by PIN, protected by biometrics. It's kind of okay.
Also, there's probably some data in your app that's sensitive too. That's why the user is using your app and if a thief's coming along and they're trying to pinch some data off the phone maybe they care more about the data that's in the database rather than this weirdo private key that's sitting next to it to facilitate intercommunication. So this is going to depend a lot on the circumstances of your app.
However, this baseline is a baseline. There are certain scenarios, certain situations, where maybe this isn't good enough. Maybe we can do better? So let's look at some of those situations where maybe you want some higher levels of security.
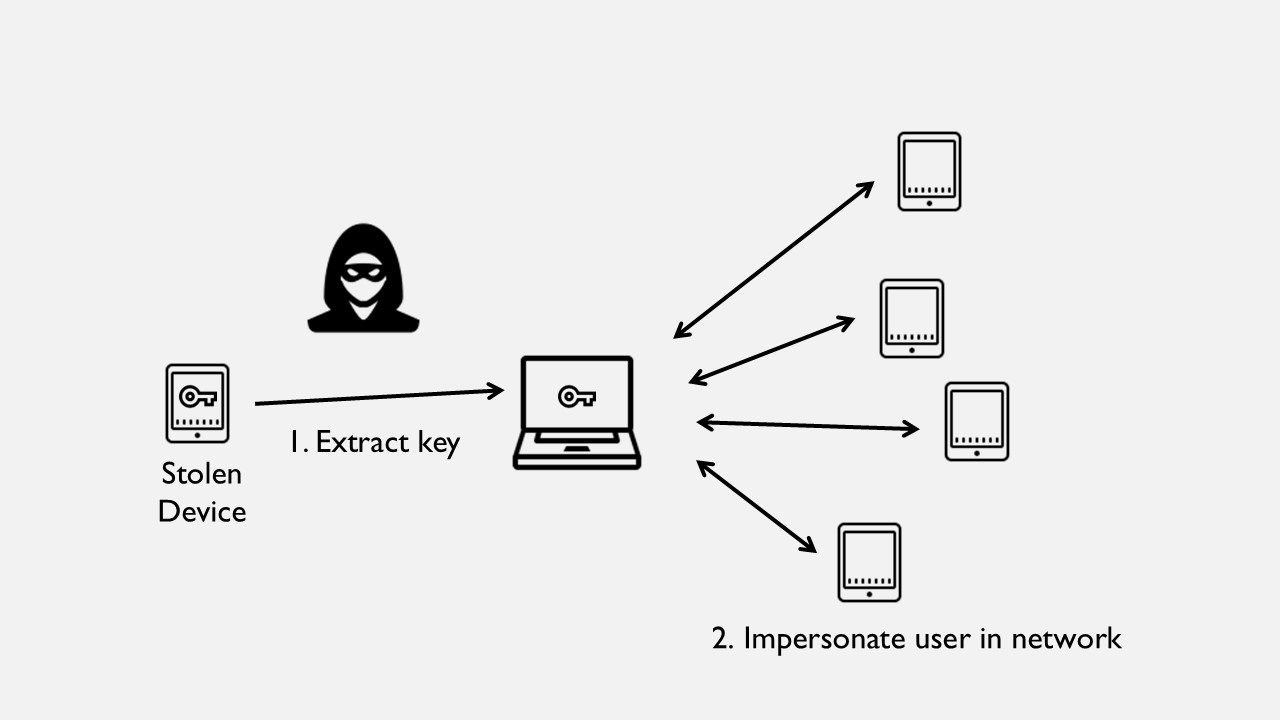
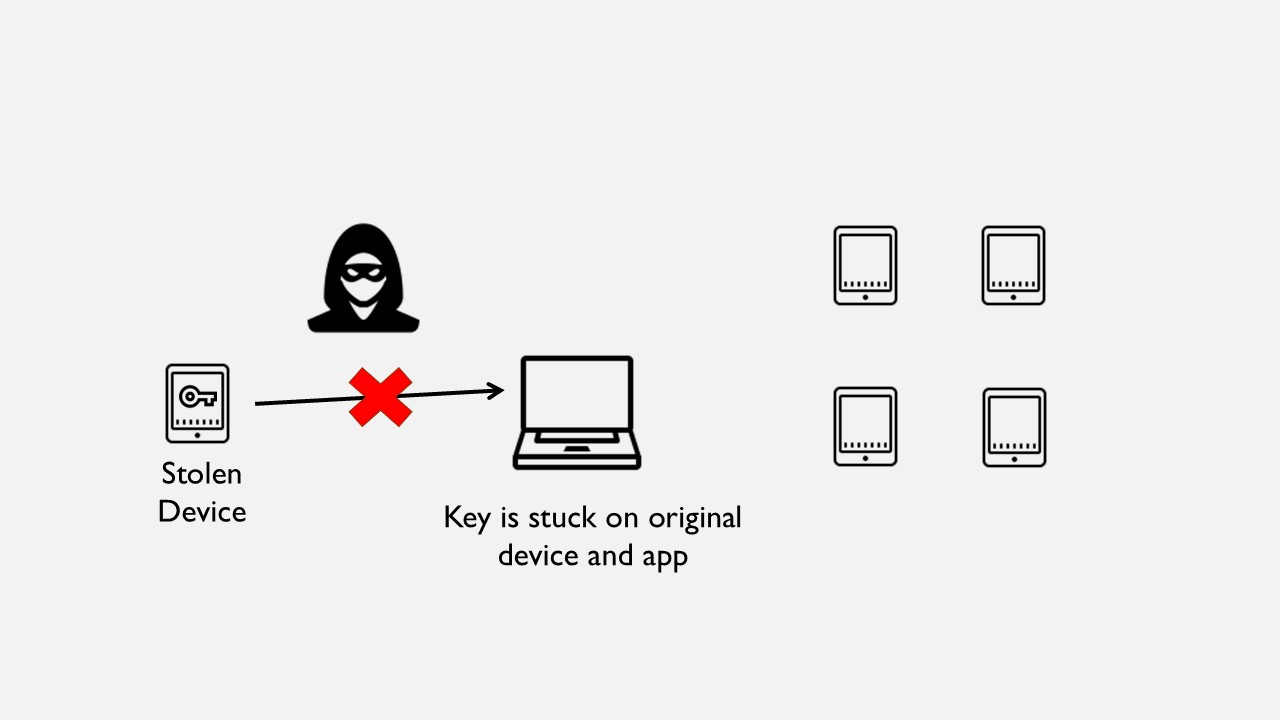
Imagine somebody physically steals the device and they know how to unlock it. They could recover the private key from the filesystem and then impersonate the original user. Once they've obtained the key they could even load it into alternative hardware and software so that they're not constrained by the operations that were allowed by your original app's UI. This means that this attacker has now upgraded themselves from a one-time data thief to an ongoing nuisance.
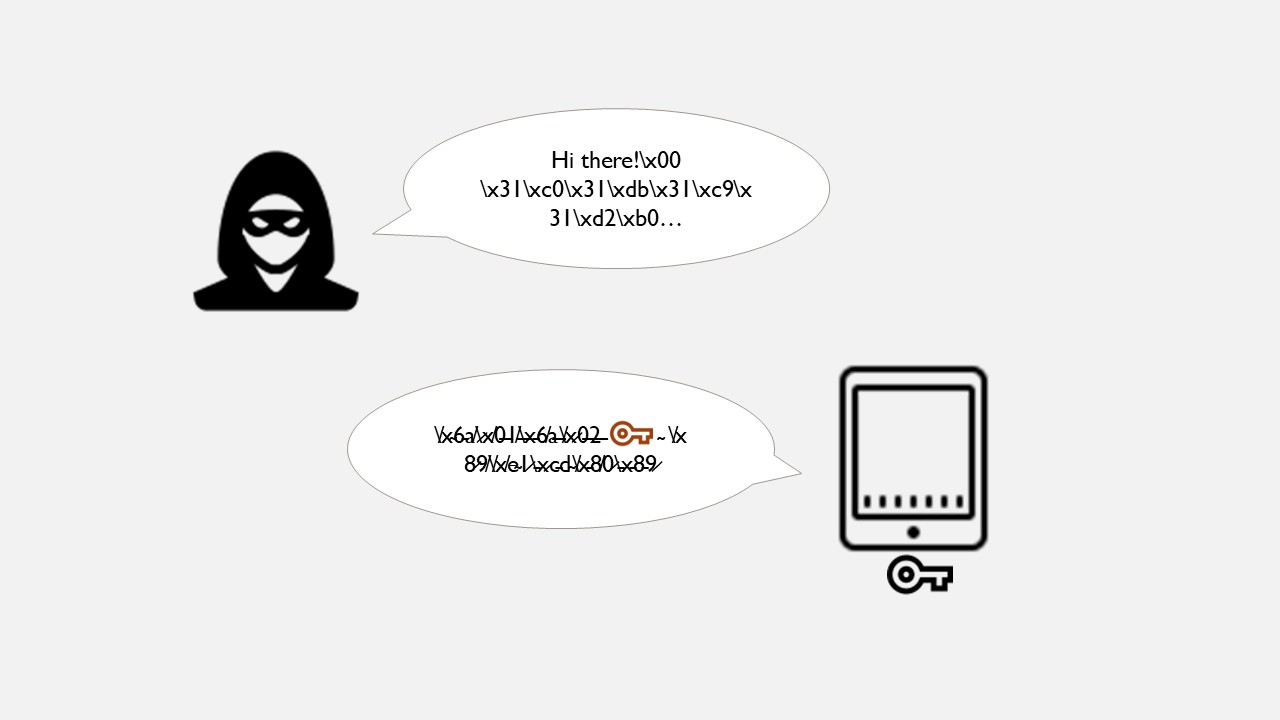
For another example, maybe your app has a memory corruption bug. Once you load the key into your app's memory space an attacker may be able to trick it, even remotely over the network, into revealing the content of that private key using specially-crafted messages. Of course, there's a higher risk here if you're still using non-memory-safe languages so stop using Objective C.
Now if you know your way around the Keychain API you might say, "Tom, hang on, you can lower the risk here by using non-extractible keys protected by the operating system" and that's true. However, if the attacker is further able to compromise a system library or process or otherwise jailbreak your phone then ultimately your key is still exposed to the application CPU and may be exposed.
You might also be thinking here, "Tom, this is kind of hardcore. This is a little bit far-fetched. Is this really something I have to think about?"
Consider this example. Maybe a small business owner has ten iPads and they need to set them all up the same way. Now, they're not an IT person. They don't want to think about IT. They don't know what an MDM is. So what they do is they think, "I know how I'm going to save some time. I'm going to set up one iPad perfectly, then I'm going to back it up, and then I'm going to restore that backup onto nine other iPads."
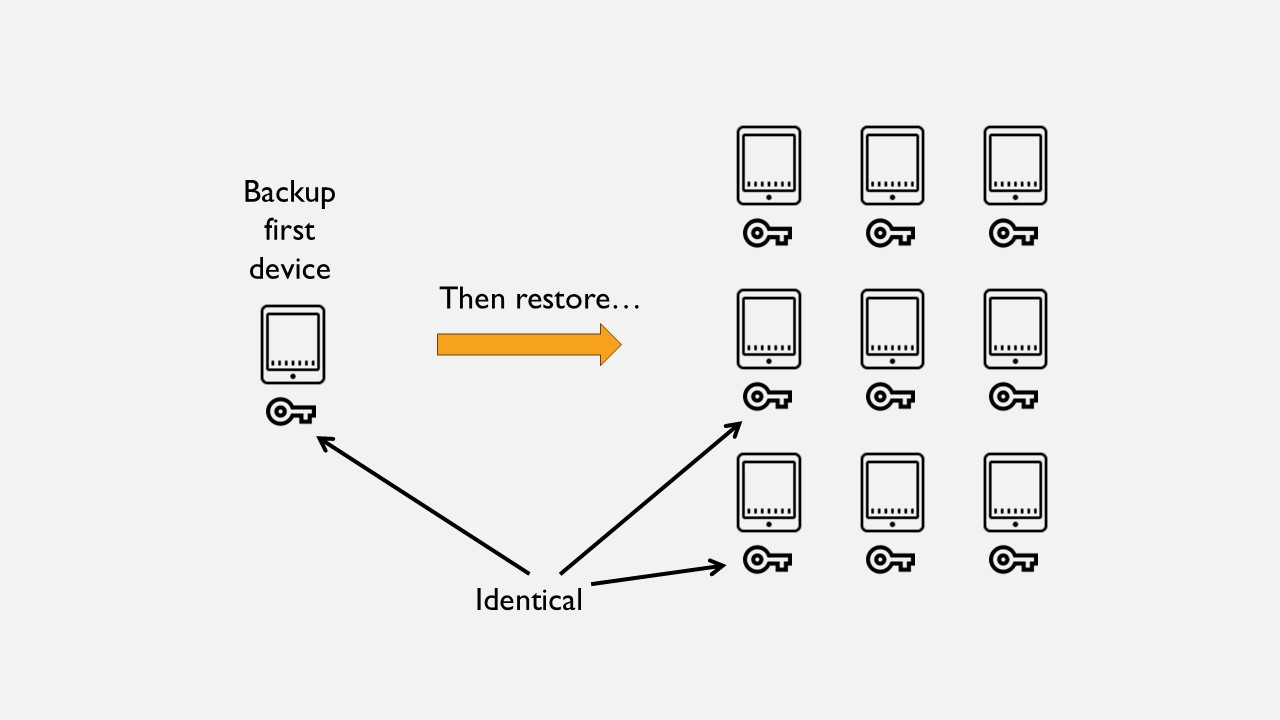
Now you have ten iPads, all of which have exactly the same private key. If your code assumes that every device has generated its own unique private key, you're going to have a bad time. ...I know about this. Recovering from this situation is an interesting problem. If you want to know more about that, come and ask me later.
Let's talk about how we can use the Secure Enclave and make it so that all of these nasty situations I've been talking about become totally impossible.
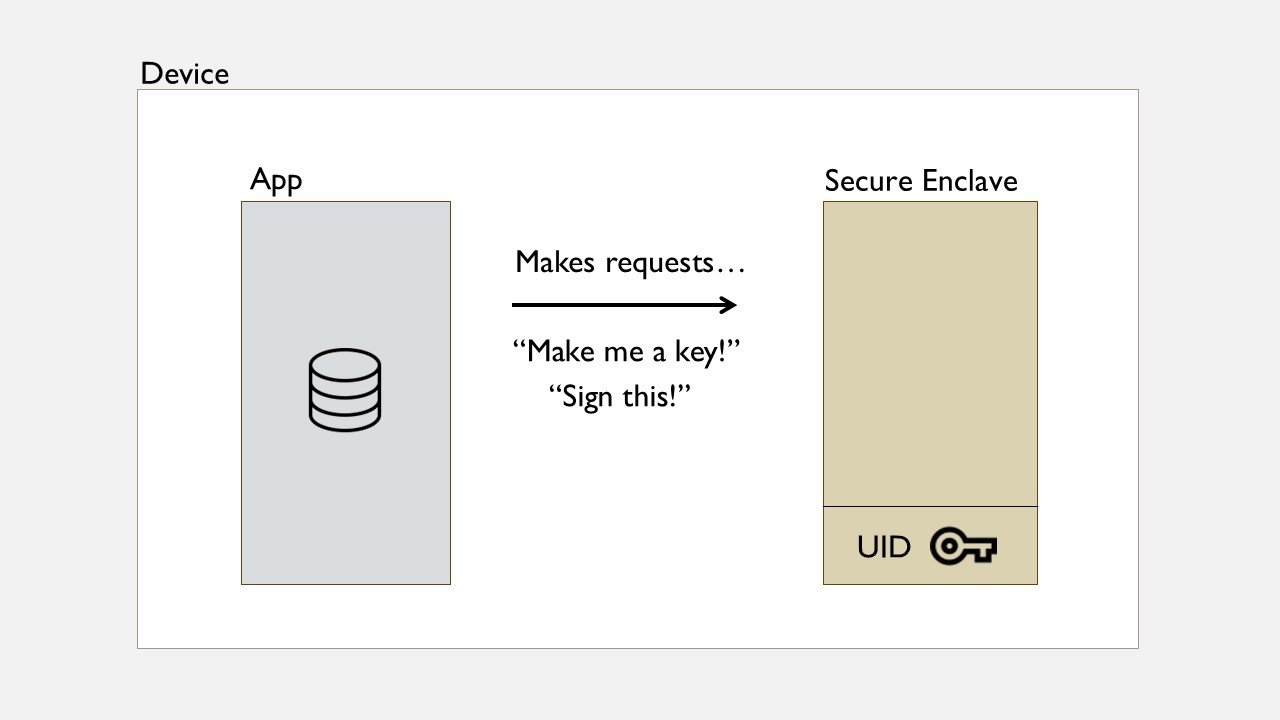
So, I already said the Secure Enclave is this component sitting inside your phone. From a developer's perspective it's actually pretty easy to operate. It's quite simple. It's a sealed box with a special secret encoded into it at manufacturing time called a "UID". This Enclave will perform tasks for you but it will not tell you its secret. It's impossible to extract, either programmatically or physically.
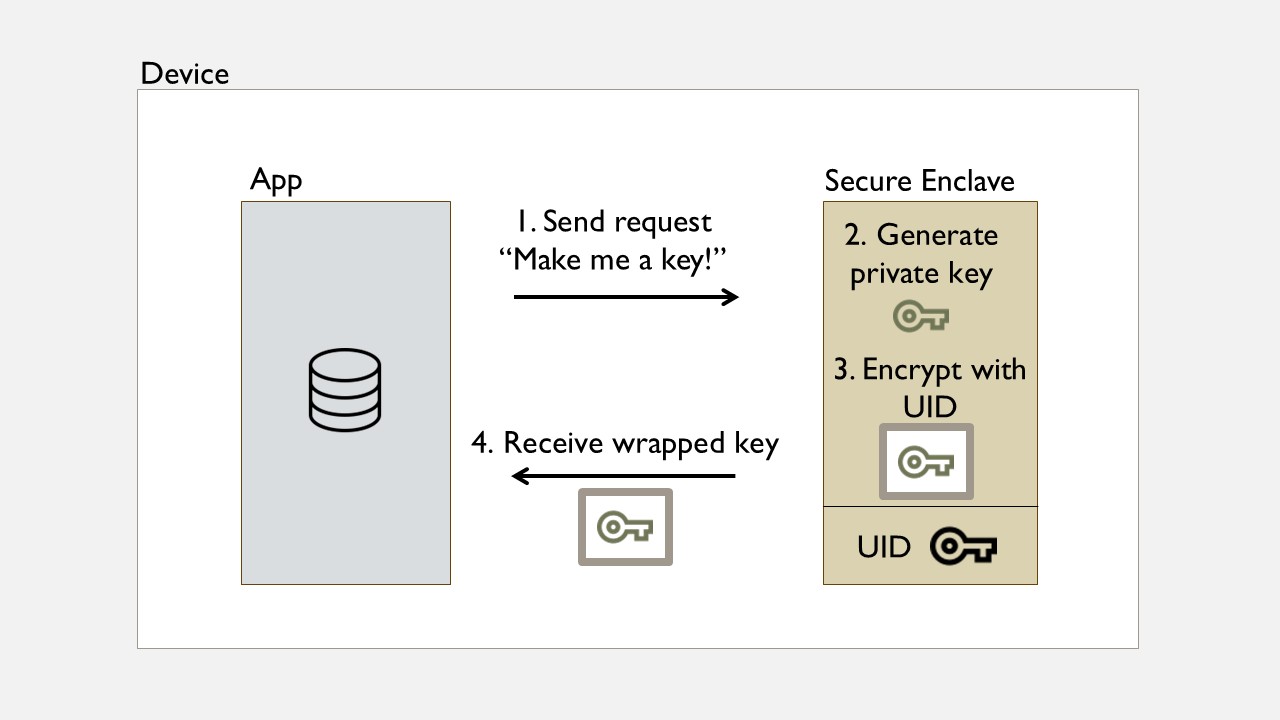
So your app comes along and it wants to generate a new private key for some purpose so it asks the Enclave. The Enclave will use its internal random number generator to generate a valid key according to the parameters that you specify. It's not going to give it to you, though. If it gave it to you, you could leak it, and then we would have all the same problems. Instead what it is does is it encrypts that new private key using its internal UID secret. This creates an encrypted blob that you can't really do anything with, and we call that a wrapped key.

So far so good. Later on, your app now wants to use that key to sign something. So it calculates a SHA256 digest of the message and passes that in with the wrapped key. The Secure Enclave will decrypt that key, getting it back out using its internal secret, and then it will calculate the signature and pass the signature back to your app.
There's a common misconception here so let's be totally clear about it. If you create a key using the Secure Enclave your key does not live within the Secure Enclave, it is not stored in the Enclave. This misconception is partly Apple's own fault because for a while they had a documentation page called "Storing your keys in the Secure Enclave" until one day Eskimo saw this and got them to fix it. Shout-out to Eskimo, who solves all our problems.
As you can see, with the Secure Enclave here, our app can do all of the same things we wanted to do before: generating keys, signing things. But with the Secure Enclave it's now kept at arm's length from that secret material.
With this Enclave there let's think about some of those problem scenarios from earlier.

Remember the business owner who was cloning their devices? Now the clones will not have a working private key any more because that wrapped key is only decryptable on the original device. You could write your code to handle that situation gracefully: "oh, my key doesn't decrypt. Well, I'll just generate a new one" and then everything's fine.

Remember the memory corruption bugs? Well, even if the attacker gets remote code execution, even if they manage to pwn your iOS, they still can't steal your key because it's protected by the Secure Enclave hardware.
What about the thief who stole the device and the passcode? It's impossible for them to lift it off disk. They can only use it in your app as-is. You probably do still need to implement some sort of blocklisting functionality for stolen devices so that the innocent devices left over aren't going to continue talking to them, but it has constrained somewhat what the thief is able to do with this device.
Hopefully now it's clear what the Secure Enclave does and why we want it. Now I want to show you a demo app that demonstrates some of these operations. After this quick video I'll show you some of the code inside this app.
This is a very simple thing exercising those functions. I press "Generate Key". The private key is protected—we can't see that—but we've drawn out the public key and made that visible in the top text field.
Now we can enter a message, something that we want to sign, and press the button to use our key to sign it via the Secure Enclave. That signature blob shows up in the bottom box.
Now, using the content of those three text fields we can press the Verify button to see if the signature checks out, and we see that it does.
Now let's test some of those things I was talking about. What happens if we modify the message but keep the key and signature the same? Okay, it doesn't verify any more. So let's put that back.
What if we modify the signature blob and try to verify that? Okay, that doesn't work either. Let's put it back and make sure everything's okay.
Now let's try modifying the public key. This is sort of similar to if it was signed by somebody else. It detects that as well. That's also a form of corruption that's picked up by this algorithm.
This demo is very simple but it probably contains most of the code you need to actually work with the Secure Enclave.

The code for generating the key looks like this. I'll just run through some of the key details very quickly. First, over on the left, you configure the access control. There are some constants that you can use here that are interesting. One of them is whether the key should continue to be available across unlocks. Also you can add a constant to say that biometric authentication is required. If you choose biometric, the Secure Enclave will enforce this all on its own that you're using Touch ID or Face ID in order to load up the key to do signing operations.
Over on the right, we are setting a tag, which is an application name for this key. Maybe we one key, maybe we have ten of them, and we need to be able to reference them by name once we've stored them. We have a flag to say that we want this to be secured by the Secure Enclave and we have to specify the key parameters. Here we're saying that it's an elliptic curve key and it's going to be 256 bits in length and this is important because the Secure Enclave only supports 256-bit EC keys. So if we choose anything else, this is going to fail.
Once you call the CreateRandomKey function you get back a handle, which is called a SecKey. That's what we use to perform our cryptographic operations. There are two important things we want to do with this handle once we have it.
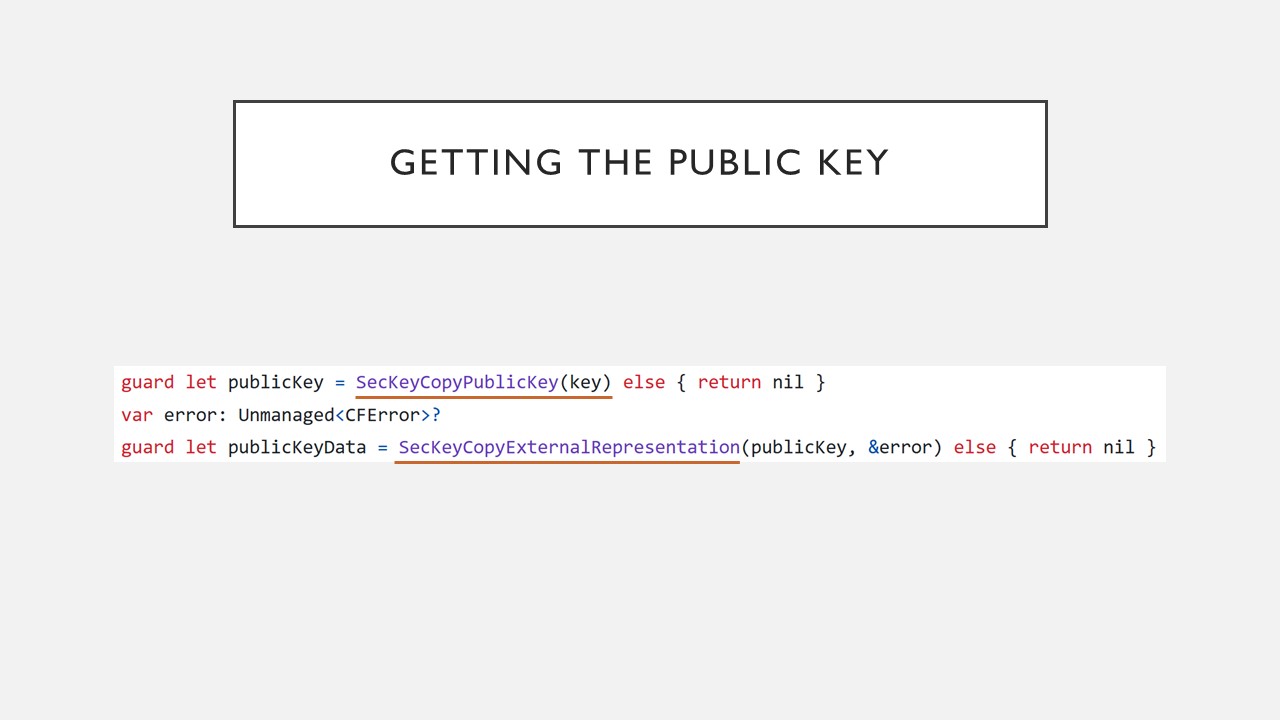
One of them is getting the public key, because we have to give that to other people. First we have to call one function to get a handle to the public key, then we have to call a second function to extract the contents of that public key as data. That's fairly straightforward.
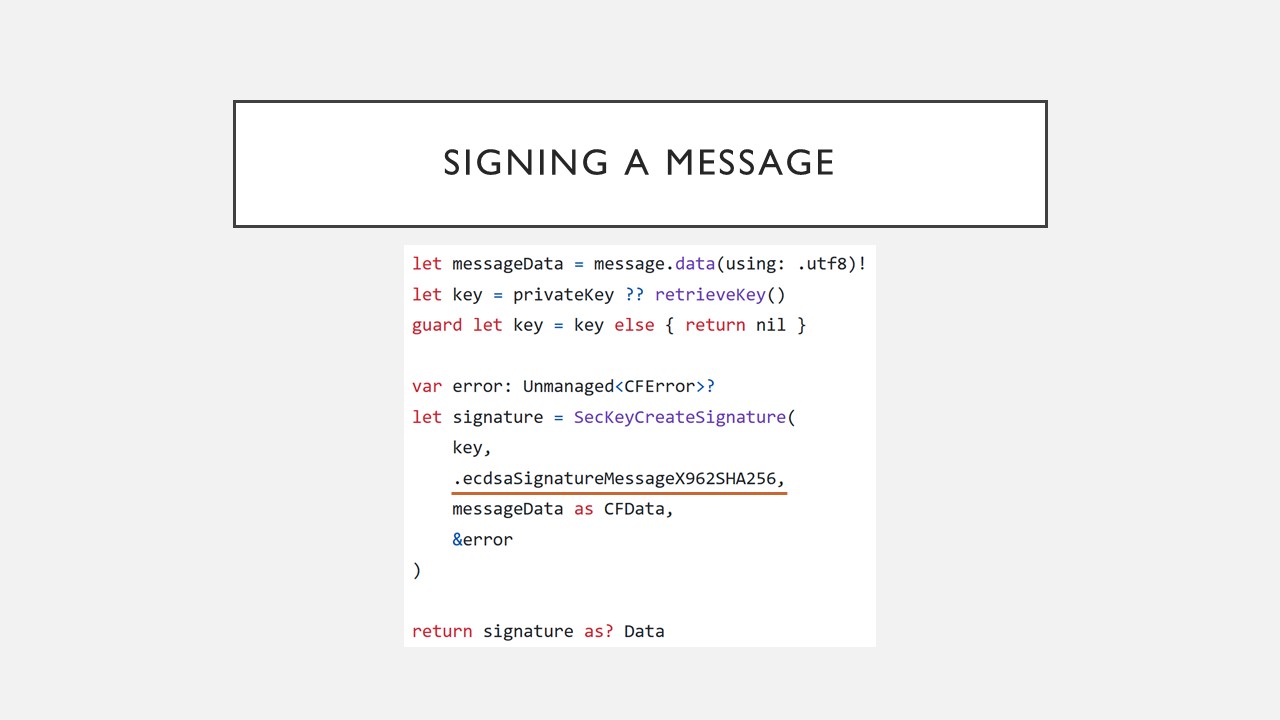
And of course we want to sign a message. This is a single function call where you pass in the key—the signing key, the private key—and the data that you want to sign. You want to pay some close attention to the constant in the middle, the algorithm. It's worth looking at the documentation here but I want to particularly call out the word in the middle, which is either "message" or "digest". When you're signing something you're actually calculating a digest, a secure hash of the data. Depending on where your message came from, you could already have a hash, or you might just have an arbitrary message that you need to have hashed for you. In this case I'm just taking the UTF-8 bytes representing the text in the text field that the user typed in, so I want the framework to take care of doing the hash for me. So I use the constant that has "message" in the middle.
That's how you sign data.
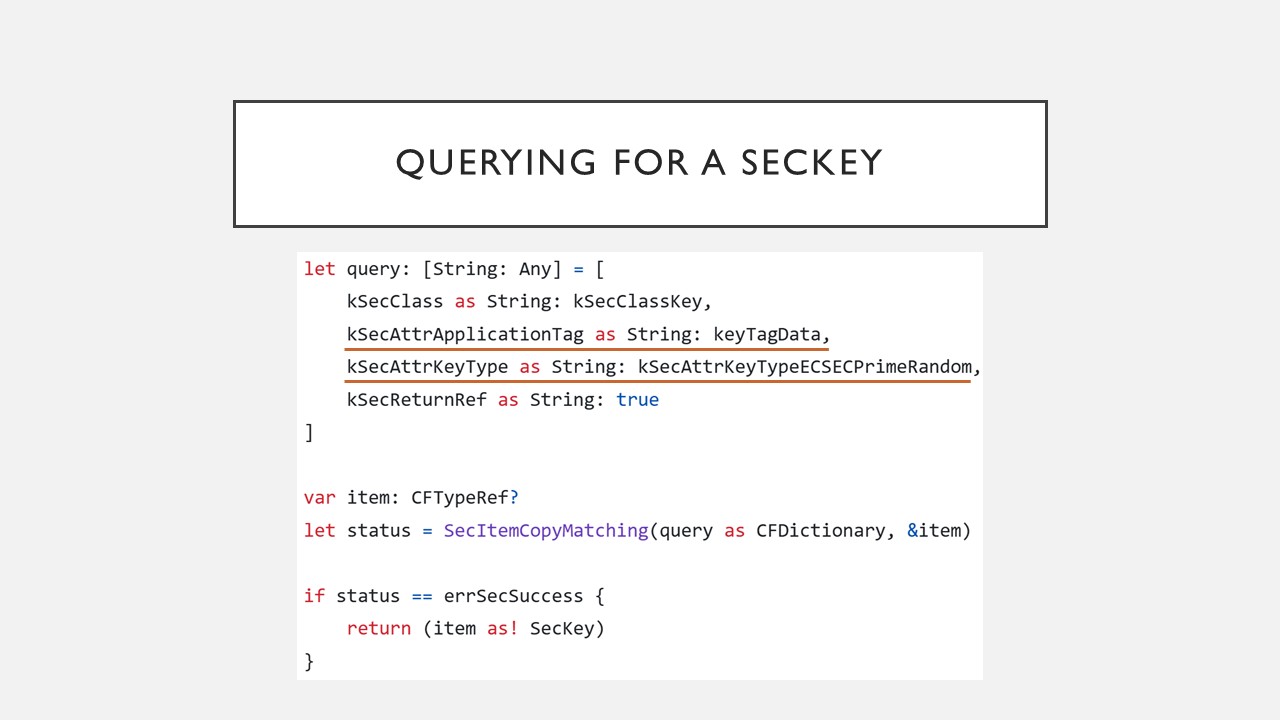
Finally, you might want a way to load your SecKey handle later on. You only got one when you generated it. What happens when your app restarts? You need to get access to that same long-lived key, so you need to create a query. You put in the tag name and the type of key, run the query, and if it's successful, you end up with a SecKey that lets you do the same things that we were just talking about.
So, with this handful of functions you too can use the Secure Enclave to sign things.
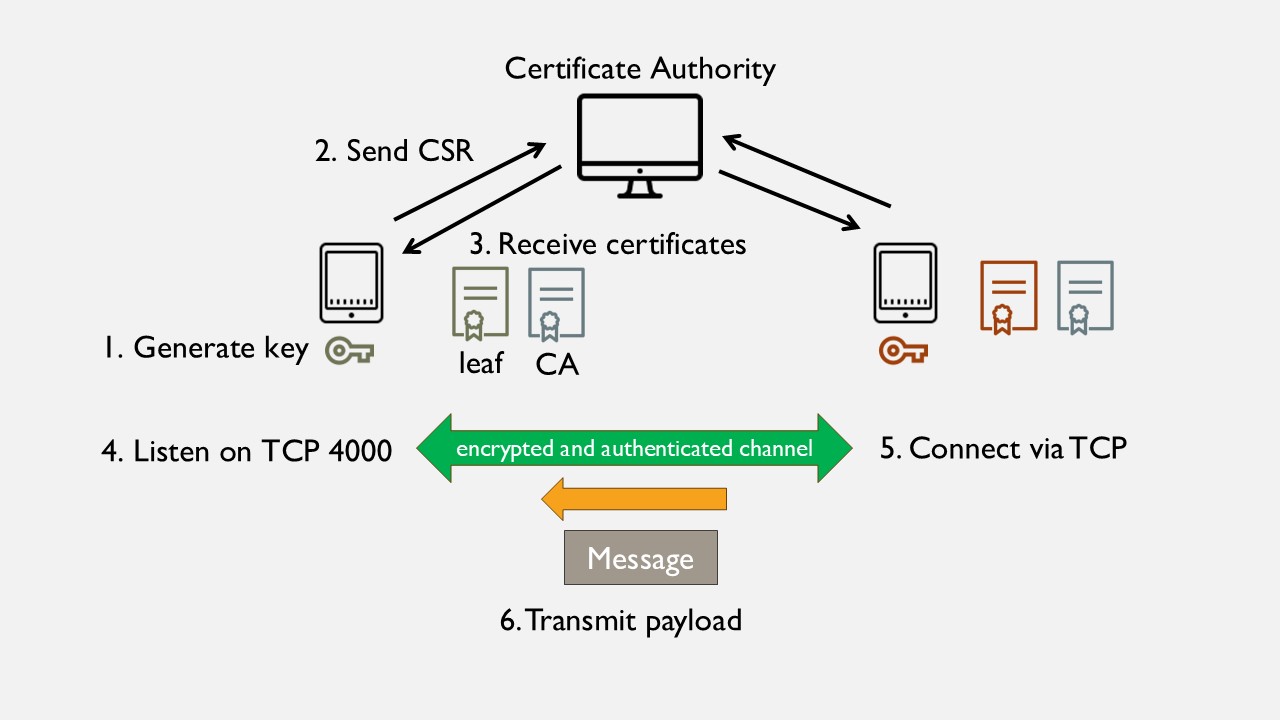
Next I want to show you a second demo, a more sophisticated way of using these building blocks to create local peer-to-peer communication. Here I want to introduce the concept of a Certificate Authority. This is that step 3 in the earlier slide.
The main thing this gives you is the ability for two devices who have never met each other before to find each other in an offline context and know that they can trust each other. They've never met each other, they can't go and check on the internet "is this person okay?" but they can trust each other. The way that works is through PKI: certificates.
What will happen here is we'll have have a Certificate Authority that's going to issue two certificates to each device. One of them is a leaf certificate which is bound to the private key stored on that device. The other one is the authority's own certificate, which is used to sign all of the leaf certificates. What this means is that any individual iPhone knows it can trust somebody else if they have a leaf certificate signed by the same CA.
This app has two parts. It's an iPhone app and it's going to talk to a server running on a PC. There's a bootstrap step where it authenticates: it generates a local key, it creates a Certificate Signing Request, sends that to the authority, and that signs the request, sending back that pair of certificates that it needs. I'll do that on both phones.
Then I set up a TCP server on one of them and a TCP client on the other one. They connect to each other, do a mutual TLS 1.3 connection, and transmit a payload, which is then shown through the app's user interface.
There are two interesting things about this demo, which I want to point out in advance. One of them is that I've included the flag to require biometrics, which means that every time there's a signing operation, you'll see the Touch ID take place in the video, where I have to put my finger on it.
The second thing is I've integrated the Swift code that does the Enclave signing with two Rust libraries. One of them's called rcgen and that's used to create the Certificate Signing Request. The other one's called rustls, which is a full TLS implementation in Rust. Both of those libraries have hooks where you can choose how the signing operation should be done, if you're not just using normal in-memory keys. I've used that to intercept those calls, bridge over to Swift code to do the operation using the Secure Enclave, and then send the result back to Rust, where it will complete the rest of the operation. In this way we get this full stack, this full TLS authentication, driven entirely by private keys which are secured by the Secure Enclave.
So let's have a look at that video now.
In the background you can see little Rust service running, which is the Certificate Authority. It's just listening out for CSRs, which are being created when I tap the Authenticate button. So now we so both of those iPhones are enrolled.
The one on the right I'm going to set up as a server by tapping "Wait for message". I've already filled out that phone's IP address on the one on the left, so they're going to connect directly to each other. I type in the message I want to send and hit "Connect". This requires a TLS handshake which requires a signature first on the server, then on the client. And we can see that our chosen message has now been securely delivered over that TCP connection. Wonderful.
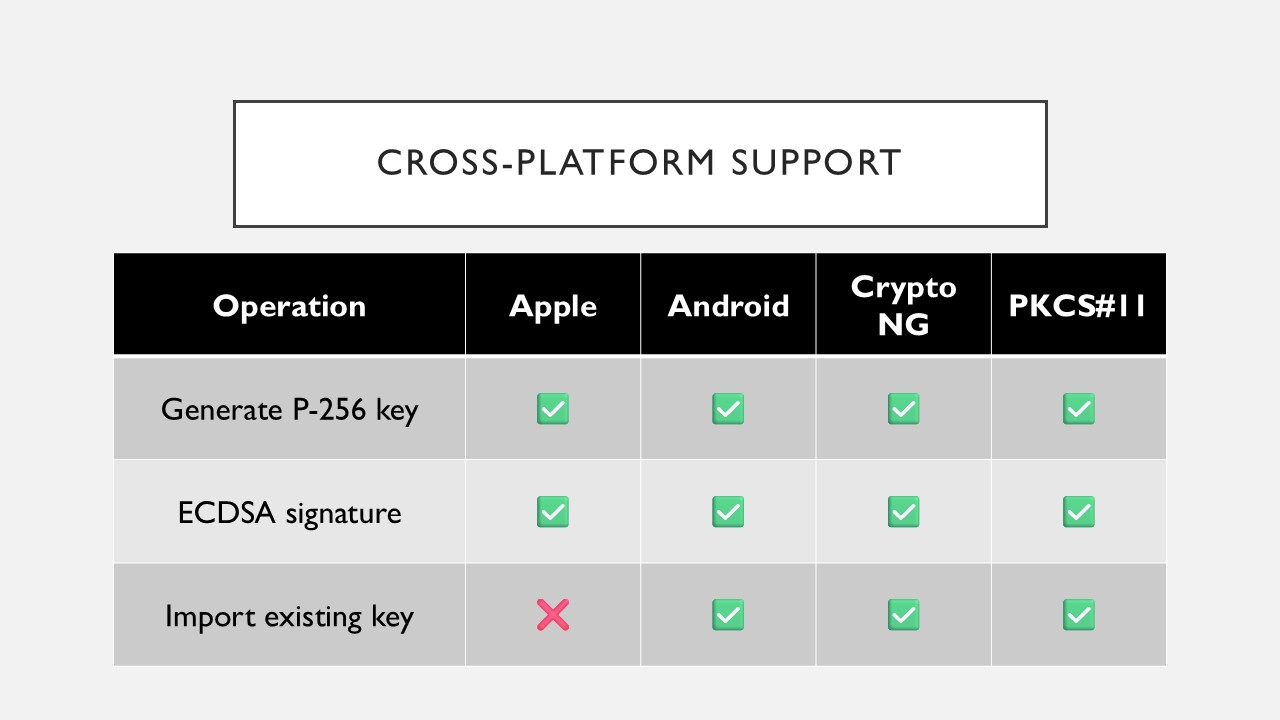
Now, obviously everything I've been talking about today is Apple-specific. Other platforms don't have Secure Enclaves, exactly. They don't have the APIs we've been talking about. Maybe they have a Secure Element, or a TPM, or something like that, or maybe you're plugging in a Yubikey, I don't know. If you're in the business of software for lots of different platforms, like Ditto is, then it's important to know how transferrable these concepts are. Is this is something you're going to be able to support cross-platform?
The simple answer is so long as you stick to P-256 ECDSA you're pretty much going to have widespread support. It's going to be okay. Apple's actually more restrictive than most platforms in that it will not allow you to enrol a key in the Secure Enclave that you generated externally. It will only let you use keys that it created itself, which means there is no possible chance that they could ever be leaked.
On Android the equivalent protection is called a "strongbox" protected key and you could either get that from a Secure Element or from a Trusted Execution Environment. Windows has a newish API called "Crypto NG", crypto next-generation. That will allow you to create and sign keys which are backed either by a hardware TPM or an operating system process like LSASS.
On Linux, as you would expect, there is no standard way of doing anything. Pretty much it's going to depend on what kind of vendor you're using to provide your hardware security module, whether that's a Yubikey or something else. The chances are if you write your code against PKCS#11 API, you'll be able to bolt it onto whatever you're using because that's sort of the lingua franca for that sort of thing.
So, let's recap what we've talked about today. We've reviewed how digital message signatures work in general and we explored two patterns of local-first communication, peer-to-peer communication, that this helps you to secure. There was the broadcasting mode, and authenticating a secure encrypted channel between two devices, using TLS as an example.
We explored some of the risks of how private keys could escape and what some of the consequences of that could be, and we saw how using the Secure Enclave stopped all of those problems from happening.
We looked at two demo apps, seeing how to use the Secure Enclave from code, and explored how we can do this from other platforms.
So no matter what kind of app you're writing, I hope everybody learnt something today. Go forth and use this wonderful Secure Enclave that Apple has given us. Thank you for listening!
Serious Computer Business Blog by Thomas Karpiniec
Posts RSS, Atom